Although I did not invent the tank or pool, and I certainly am not the first to shoot subjects in water, I have been doing a lot of it lately, and a few of you have inquired about how we built our tank. My husband is the real hero here. He built the whole thing for me (twice) and came up with the idea of gluing the pieces together for stability since we aren't traveling with the water tank.
So, here's the gist:
Supplies:
1.5 inch PVC Pipe
T couplings for connecting straight sides and adding stability
90 degree angles for the corners
PVC cement and primer (if you don't need to take it apart and move it to a new location)
Saw for cutting pipes to length (or get them cut for you at the store)
First decide what size you want your pool to be. Remember to make it long enough and wide enough for at least two subjects to fit in, full-length, with room around them. You can extend the edges of your canvas in photoshop, but you'll need space around your subjects to do that. Last summer my tank was about 6 x 8'. this year it turned out a bit longer. You buy the PVC pipe in long pieces, so you'll need to be able to cut them smaller yourself, or have them cut into smaller sections before you leave the store. The smaller pieces allow you to use the couplings and 90s for added stability. Plus, if you want to travel with your tank, the smaller sections fit better in a vehicle.
With the weight of all the water on the tank, the sections can sometimes separate from one another, especially if the ground isn't perfectly even, so we use PVC cement to glue the sections and connectors together. It is very sturdy and can handle quite a bit of weight.
There are no rules about how long your pieces need to be or how many connectors you use to add stability. Just get the long pieces of pipe you need and cut them into slightly smaller pieces. Then you'll know how many connectors you'll need.
At home, lay it all out on the ground so you can get a visual of what it will look like put together. Basically, build two rectangles and use the T couplings and small, evenly cut pieces of pipe to connect the two rectangles, one on top of the other.
Geez! I'm not very good at writing out directions for building a structure! Hopefully the pictures will help, and feel free to ask questions if I've totally ofuscated the process for you.

The framework: two rectangles connected by braces

The T Couplings and the 90s for the corners.
Next, I put down a giant tarp to hold in the water.

Then put down a large backdrop that you might use for painting a room (or any other giant piece of fabric/backdrop material that you have. Experiement!
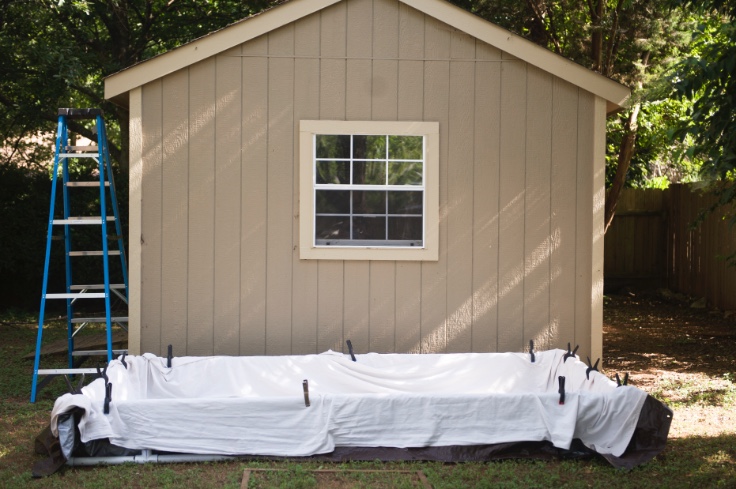
Use big clamps, several on each side, to hold the tarp and backdrop in place. Last, add water-- just enough to cover most of the body and leave some of the face out of the water. Of course, you could submerge your model to try something different, of course, if they are willing. ;)
I have our tank up next to this shed for two reasons. One, it happens to be nice, even light at the end of the day, and 2. it's the only place in my yard, where I can get the perspective I want. I've used a ladder before, but I find it is hard to get the entire subject into the image that way. Plus, I lean over quite a bit to get a direct overhead shot, and I feel like the ladder is going to tip over. So I sit at the apex of the roof and shoot over the edge.
I'd love to hear what you have built or added, different materials you've tried as backdrops, things you've learned along the way that have been easier or just plain awesome. Leave a comment or ask questions if you like!
Have fun!
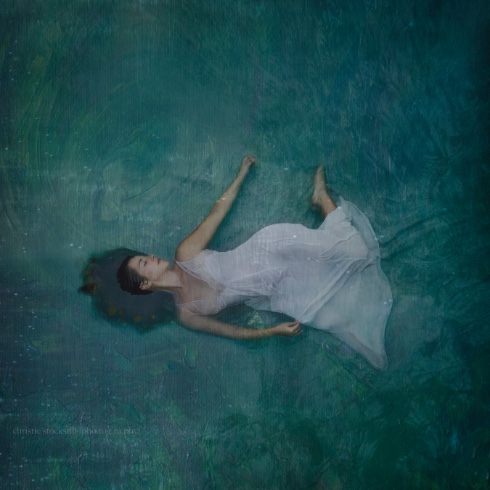
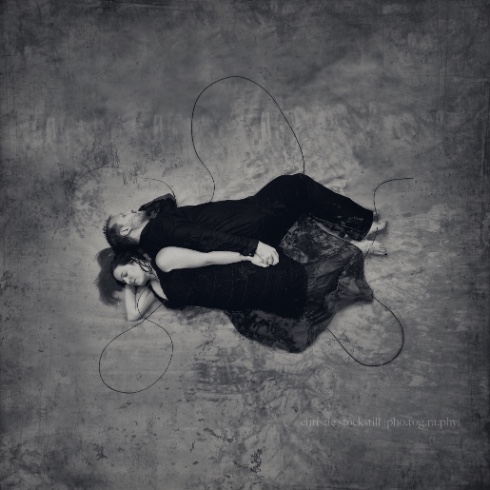
Here are a few images I created in the tank, all with the same exact set-up and same back-drop.


4 Comments
Jan 20, 2016, 8:57:21 AM
Christie Stockstill - So many possibilities! I encourage you to give it a go. Thanks for reading!
Jan 20, 2016, 8:18:49 AM
timmon - i have heard about people using water tanks for photography but never seen it before or the images which are amazing by the way. thanks for showing me how to build my own tempted to give it a try
Jul 15, 2015, 9:21:25 AM
Christie Stockstill - It's interesting how many different ways there are to get things done. Fog machine sounds like fun to try! We measured the tank, but I can't remember what they dimensions are off the top of my head. It's a foot and a half high, and pretty close to 8 x 10 feet.
Jul 13, 2015, 10:42:28 PM
KathyP - This is very cool. What were the dimensions when done? Love the idea of you shooting from the roof, you are braver then I lol.
I made a couple for indoor out of plywood and 2 x 4's and lined with plastic using clamps as you did. Goes together quickly and works very well, although messier when using indoors. I covered the entire floor with plastic. I made a 2nd one as a 'puddle pool' just out of 2 x 4's.
If the water is cool, try a smoke machine, the smoke stays on top of the cool water, you can get some amazing shots. Have fun!